# Simple ways to enrich your gaming experience at home
The gaming landscape has evolved dramatically over recent years, transforming from a casual pastime into an immersive experience that demands attention to detail across hardware, software, and environment. Whether you’re engaged in competitive esports titles or exploring sprawling single-player adventures, the quality of your home gaming setup directly influences your enjoyment, performance, and long-term comfort. Creating an enriched gaming experience doesn’t necessarily require enormous financial investment—rather, it demands thoughtful consideration of which upgrades deliver the most significant impact for your specific gaming preferences and circumstances.
Modern gaming encompasses far more than simply purchasing the latest console or graphics card. The convergence of cutting-edge display technology, spatial audio systems, network infrastructure, and ergonomic furniture has created opportunities for gamers to craft truly personalised environments. From reducing input lag through network optimisation to preventing physical strain with proper seating, each element contributes to a cohesive ecosystem that enhances immersion whilst supporting extended gaming sessions. Understanding which improvements align with your priorities enables you to make informed decisions that genuinely transform how you interact with your favourite titles.
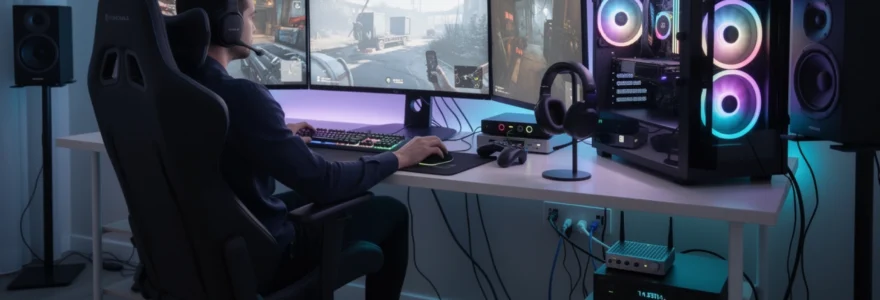
Optimising your gaming rig: hardware upgrades for maximum performance
The foundation of any exceptional gaming experience lies within the hardware powering your system. Whilst complete rebuilds attract attention, targeted upgrades often deliver disproportionate improvements in performance, responsiveness, and visual fidelity. Identifying bottlenecks in your current configuration allows you to allocate resources efficiently, addressing the components that genuinely restrict your gaming potential rather than pursuing incremental gains across all areas simultaneously.
Performance optimisation extends beyond raw computational power—it encompasses how effectively your system communicates information between components, how quickly it accesses stored data, and how reliably it translates your inputs into on-screen actions. The synergy between processor, graphics card, storage solution, and peripherals determines whether your gaming experience feels fluid and responsive or frustratingly sluggish. By understanding the specific role each component plays within this ecosystem, you can prioritise upgrades that address your most pressing performance concerns whilst remaining within budgetary constraints.
Installing High-Refresh-Rate monitors: 144hz vs 240hz display technology
Display technology represents one of the most transformative upgrades available to gamers, yet refresh rate capabilities remain widely misunderstood. A monitor’s refresh rate, measured in hertz (Hz), indicates how many times per second it updates the displayed image. Traditional 60Hz displays refresh sixty times per second, whereas 144Hz panels more than double this frequency, and 240Hz monitors quadruple it. The practical implications become immediately apparent in fast-paced genres—first-person shooters, racing simulators, and competitive fighting games benefit enormously from reduced motion blur and decreased input-to-display latency.
The decision between 144Hz and 240Hz technology depends primarily on your hardware capabilities and gaming preferences. A 144Hz display provides substantial improvements over standard 60Hz panels, delivering noticeably smoother motion that most gamers recognise immediately. The jump to 240Hz offers additional refinement, though the perceptual difference proves less dramatic than the initial upgrade from 60Hz to 144Hz. Competitive players in titles like Counter-Strike, Valorant, or Apex Legends may appreciate the marginal advantage, whilst those focused on visually stunning single-player experiences might prioritise resolution or colour accuracy instead. Your graphics card must consistently generate frame rates matching or exceeding your monitor’s refresh rate to fully leverage these capabilities—pairing a 240Hz display with hardware that struggles to maintain 100 frames per second creates a mismatch that wastes the monitor’s potential.
GPU overclocking techniques for enhanced frame rates
Graphics card overclocking extracts additional performance from existing hardware by increasing the operating frequencies of the GPU core and video memory beyond manufacturer specifications. Modern graphics cards incorporate sophisticated boost algorithms that automatically adjust clock speeds based on thermal headroom and power availability, but manual overclocking pushes these boundaries further. Utilities like MSI Afterburner, EVGA Precision X1, and ASUS GPU Tweak provide granular control over voltage, clock speeds, fan curves, and power limits, enabling enthusiasts to systematically explore their card’s performance ceiling.
Successful overclocking requires patience and methodical testing—incrementally increasing core clock speeds by
Successful overclocking requires patience and methodical testing—incrementally increasing core clock speeds by small steps (for example, 15–25 MHz at a time) and validating stability with stress tests such as 3DMark, Unigine Heaven, or long gaming sessions. You should monitor temperatures and power draw using tools like HWMonitor or GPU-Z, ensuring that core temperatures remain comfortably below the thermal limit (typically under 80–84°C for most modern GPUs). If instability appears in the form of driver crashes, artefacts, or system reboots, dial back the last change and retest to find the highest stable configuration. Whilst modest overclocks of 5–10% may sound small on paper, they can translate into several additional frames per second in demanding titles, especially when combined with a high-refresh-rate monitor. Always balance performance gains against fan noise and longevity—pushing voltages aggressively may deliver short-term improvements but risks increased wear on components over time.
Nvme SSD implementation to reduce loading times
Storage technology exerts a profound influence on day-to-day gaming responsiveness, particularly in open-world titles that stream vast quantities of data in real time. NVMe SSDs, which utilise the PCIe interface instead of SATA, offer dramatically higher bandwidth and lower latency, meaning textures, levels, and assets load significantly faster. For players coming from traditional hard drives, migrating your game library to an NVMe drive can feel akin to lifting a bottleneck you did not realise existed—boot times shrink, fast travel becomes near-instant, and in-game stuttering during asset streaming is often reduced.
Implementing an NVMe SSD within a home gaming setup typically involves installing the drive into an available M.2 slot on your motherboard and then cloning your existing system drive or performing a fresh installation of your operating system. Many gamers opt for a tiered approach, using a smaller, ultra-fast NVMe drive (for instance, 1TB) for their operating system and most-played titles, whilst relegating less demanding or rarely used games to a larger SATA SSD or HDD. When choosing an NVMe drive, pay attention to both sequential speeds and random read/write performance, as the latter more closely reflects real-world gaming workloads. Ensuring adequate motherboard heatsinks or adding aftermarket cooling for high-performance NVMe drives can also help maintain consistent speeds during extended gaming sessions.
Mechanical keyboard switches: cherry MX vs razer optical
Your keyboard forms a critical part of the feedback loop between you and the game, and the switch technology beneath each key can meaningfully influence comfort, accuracy, and enjoyment. Cherry MX switches have long been considered the industry standard, offering a wide array of tactile, linear, and clicky variants such as MX Red, Brown, and Blue, each tuned to different actuation forces and feedback preferences. Razer Optical switches, by contrast, use a light beam to detect key actuation rather than traditional metal contacts, enabling faster response times and reducing potential wear from mechanical contact over the long term. For fast-paced genres like competitive shooters or rhythm games, the difference between a sluggish membrane keyboard and a well-chosen mechanical board can feel as obvious as upgrading from 60Hz to 144Hz.
When comparing Cherry MX to Razer Optical switches, it helps to think in terms of both feel and performance. Cherry’s offerings prioritise tried-and-tested reliability and a familiar typing sensation, with actuation points typically around 2 mm and lifespans often rated at 50 million keystrokes. Razer Optical switches refine this experience with shorter actuation distances and optical actuation, which can provide a marginal edge in reaction-based gameplay and reduce debounce delay. However, not every gamer will perceive the difference in raw speed; many prioritise sound profile, key weight, and overall typing comfort instead. Wherever possible, trying different switch types in person—whether at a local retailer or through switch tester kits—remains the most reliable method for determining which mechanical keyboard best enriches your home gaming experience.
Acoustic treatment and immersive audio setup configuration
Whilst visuals often receive the lion’s share of attention, audio plays an equally important role in transforming a basic gaming setup into a truly immersive environment. High-quality sound design can alert you to enemy footsteps, convey spatial awareness in complex arenas, and deepen emotional engagement with story-driven titles. Yet, even premium speakers or headsets can sound underwhelming if the surrounding room acoustics work against them, introducing echoes, muddiness, or excessive reverberation. By optimising both your playback hardware and the acoustic properties of your gaming space, you can unlock a more detailed, accurate soundstage that benefits everything from competitive shooters to cinematic RPGs.
Dolby atmos surround sound system positioning
Dolby Atmos has reshaped expectations for home gaming audio by adding height channels and object-based sound, creating a three-dimensional soundscape rather than a simple horizontal ring of speakers. To take full advantage of Atmos in a dedicated gaming room, speaker placement becomes crucial: front left and right channels should form an equilateral triangle with your primary seating position, whilst the centre channel sits directly in front, aligned with the display. Surround speakers—typically placed to the sides or slightly behind—should be at or just above ear level to maintain consistent imaging around the listening area. Height channels, whether achieved through in-ceiling speakers or upward-firing Atmos-enabled units, add vertical information such as helicopters overhead or rain falling from above, significantly enhancing immersion.
Even in smaller gaming rooms, careful attention to angles and distances helps prevent localisation issues where sounds feel disconnected from on-screen action. Manufacturers often provide recommended placement diagrams and calibration tools, and modern AV receivers usually include room correction systems such as Audyssey or Dirac Live, which measure your space with a supplied microphone and adjust output accordingly. If a full 5.1.2 or 7.1.4 Dolby Atmos speaker layout is impractical, soundbars with virtualised Atmos support offer a compromise that still delivers perceptible height effects, especially in acoustically sympathetic rooms. The overarching goal is to create a coherent bubble of sound around your primary seating area, so what you hear aligns intuitively with what you see.
Noise-cancelling headphone selection: sony WH-1000XM5 and SteelSeries arctis pro
For many home gamers, loudspeakers are not always feasible due to shared living spaces, thin walls, or late-night sessions. In such cases, high-quality noise-cancelling headsets can provide an excellent alternative, isolating you from environmental distractions whilst delivering detailed game audio. The Sony WH-1000XM5, for example, is widely regarded as one of the best active noise-cancelling headphones available, particularly suited to players who alternate between gaming, music, and media consumption. Its adaptive noise cancellation, comfortable fit, and long battery life make it ideal for extended sessions, though it relies on Bluetooth by default, which can introduce latency if not paired with low-latency codecs or a dedicated transmitter.
By contrast, the SteelSeries Arctis Pro is designed from the ground up as a gaming-focused headset, offering low-latency wired or wireless connections, a broadcast-quality retractable microphone, and tuning that emphasises positional cues important for competitive play. Whilst its passive isolation may not match the Sony’s active cancellation in noisy environments, the Arctis Pro provides more straightforward integration with PCs and consoles via USB DACs or wireless bases, allowing for custom EQ profiles and chat/game audio balancing. When choosing between noise-cancelling headphones for gaming at home, consider both your typical noise environment and primary use cases—are you seeking a versatile, everyday headphone that also handles gaming, or a dedicated gaming headset optimised for clear communication and positional accuracy?
Soundproofing panels and bass traps for dedicated gaming rooms
Even the best surround system or headset can be compromised by poor room acoustics; hard, reflective surfaces tend to cause echoes and standing waves that blur audio detail. Acoustic panels and bass traps address this by absorbing problematic frequencies, improving clarity and reducing unwanted reverberation. Wall-mounted foam or fabric-wrapped panels, positioned at first reflection points (typically the side walls and ceiling where sound from your speakers first bounces towards your ears), can substantially tighten the stereo image and make dialogue easier to understand. Meanwhile, bass traps—usually larger, denser panels placed in room corners—help tame low-frequency buildups that make explosions and musical scores sound boomy rather than punchy.
Implementing basic acoustic treatment does not require turning your gaming room into a professional studio; even a modest number of well-placed panels can yield a noticeable improvement. Begin by identifying the most reflective surfaces near your listening position and addressing those first, then gradually expand treatment to rear walls or ceilings if budget allows. Many gamers also appreciate the aesthetic element of acoustic treatment, as panels now come in a variety of colours and printed designs that can complement RGB lighting and decor. Beyond enhancing your personal listening experience, soundproofing measures—such as sealing door gaps or adding dense curtains—also help prevent your gaming audio from disturbing others elsewhere in the home.
DAC and amplifier integration for high-fidelity gaming audio
On many consumer devices, the built-in audio circuitry represents a compromise between cost and quality, which can bottleneck the performance of good speakers or headphones. A dedicated DAC (Digital-to-Analog Converter) and headphone amplifier system bypasses these limitations by providing cleaner conversion and more robust amplification, resulting in improved dynamic range, reduced noise, and greater control over demanding headphones. For gamers using high-impedance or audiophile-grade headsets, a separate DAC/amp can be the missing link that unlocks their full potential, revealing subtle environmental cues like distant footsteps or ambient details that were previously masked.
Integrating an external DAC into your home gaming setup is usually straightforward: you connect it to your PC or console via USB or optical output, then route your headphones or powered speakers through the DAC or attached amplifier. Many gaming-oriented DAC/amps include virtual surround processing and EQ profiles tailored to popular titles, offering the best of both worlds—improved fidelity and gaming-specific enhancements. When choosing a unit, verify compatibility with your platform, particularly if you intend to use it across PC, console, and mobile devices. Ultimately, if you have already invested in quality headphones but feel their performance is underwhelming, adding a DAC and amplifier is often a more cost-effective upgrade than replacing the headphones themselves.
RGB lighting ecosystems and ambience engineering
Lighting has evolved from a purely functional consideration into a powerful tool for immersion, mood-setting, and visual coherence in home gaming spaces. Thoughtfully deployed RGB lighting can subtly reinforce on-screen action, reduce eye strain, and visually tie together disparate elements of your setup, from your PC case to your wall decor. Rather than simply flooding the room with colour, the most effective gaming setups treat lighting as an integrated ecosystem—coordinating strips, panels, peripherals, and smart bulbs under unified control software. This allows you to shift effortlessly between calm, work-friendly tones during the day and dynamic, game-synchronised effects in the evening.
Philips hue sync and nanoleaf panels for dynamic backlighting
Dynamic backlighting solutions extend your game’s colour palette beyond the boundaries of the screen, effectively widening your visual field and deepening immersion. Philips Hue Sync, for instance, analyses the colours on your display in real time and mirrors them through Hue-compatible bulbs and light strips placed behind your monitor or around the room. This creates a subtle halo that tracks explosions, environmental changes, and menu transitions, making the room feel like a natural extension of the game world. Similarly, Nanoleaf panels—modular, wall-mounted light tiles—can be programmed to respond to in-game audio or pre-set scenes, transforming a plain wall into a reactive canvas of light.
To extract the most benefit from these systems, placement and brightness control are key. Mounting strips or panels behind your display or along adjacent walls prevents direct glare whilst still providing strong peripheral illumination. Many gamers find that keeping dynamic effects relatively restrained—focusing on gentle gradient shifts rather than rapid, flashing patterns—balances immersion with comfort during longer sessions. Both Hue and Nanoleaf ecosystems integrate with popular platforms such as PC, consoles (via HDMI sync boxes), and smart home assistants, enabling you to tie your gaming profiles to voice commands or automation routines that dim overhead lights and activate specific scenes when you launch a game.
Corsair iCUE and ASUS aura sync software integration
On the PC side, manufacturers such as Corsair and ASUS have built comprehensive software ecosystems—iCUE and Aura Sync, respectively—that unify RGB control across internal components and peripherals. With these tools, you can synchronise lighting effects between your keyboard, mouse, RAM modules, GPU, and even case fans, creating a cohesive visual identity for your gaming rig. Beyond aesthetics, some users configure their lighting to convey useful system information: for example, shifting from cool blues to warm reds as GPU temperatures rise, or flashing a particular colour when CPU utilisation peaks. This transforms RGB from mere decoration into a functional feedback mechanism.
Integrating multiple brands within a single RGB lighting ecosystem can be challenging, as proprietary standards do not always communicate seamlessly. However, many third-party utilities and community-developed plugins now help bridge gaps between Corsair iCUE, ASUS Aura Sync, and other platforms such as Razer Chroma or MSI Mystic Light. When planning a new build or major upgrade, considering RGB compatibility early can save frustration later—choosing components that share a common control suite simplifies both installation and daily use. Ultimately, whether you prefer a minimalist white glow or a fully animated, colour-cycling theme, centralised software integration keeps your lighting consistent and easy to manage.
Bias lighting configuration to reduce eye strain
Beyond spectacle, one of the most practical uses of RGB lighting in a home gaming setup is bias lighting—placing a soft light source behind your display to reduce the perceived contrast between the bright screen and a dark room. This subtle halo of light helps minimise eye fatigue during long sessions, particularly in low-light environments, and can even enhance perceived black levels on certain displays. Ideal bias lighting should be neutral in colour temperature (typically around 6500K) and relatively low in brightness, illuminating the wall behind your monitor without spilling directly into your eyes.
Installing bias lighting usually involves attaching LED strips to the back of your monitor or television, positioned near the outer edges to create even illumination. Many strips offer adjustable brightness and colour temperature controls, allowing you to fine-tune the effect to your room and personal preference. Whilst multi-colour RGB strips are popular for their flexibility, some gamers prefer dedicated white bias lighting that maintains consistent colour accuracy for both gaming and content creation. Experimenting with different intensities and hues can help you find a configuration that feels comfortable and enhances perceived contrast without becoming distracting.
Network infrastructure optimisation for competitive gaming
Even the most powerful gaming PC and pristine picture quality can be undermined by unreliable network performance, especially in competitive online titles where split-second decisions determine the outcome. Latency, packet loss, and jitter can manifest as rubber-banding, delayed hit registration, or sudden disconnections, all of which erode your ability to perform consistently. Optimising your home network infrastructure for gaming involves both physical choices—such as cabling and router placement—and configuration-level adjustments that prioritise game traffic over background processes. With thoughtful tuning, you can often achieve a more stable, responsive connection without needing to upgrade your entire internet plan.
Ethernet CAT8 cabling vs Wi-Fi 6E mesh systems
For pure reliability and low latency, a wired Ethernet connection remains the gold standard; running CAT6, CAT7, or CAT8 cabling directly from your router to your gaming PC typically delivers the most consistent ping and minimal interference. Whilst CAT8 cables boast higher shielding and bandwidth ratings than earlier categories, in most home environments CAT6 or CAT6a provides ample headroom for gigabit gaming traffic. The main challenge, of course, lies in physically routing cables through walls, under carpets, or along skirting boards—tasks that may be impractical or undesirable in rented or shared spaces.
In such cases, modern Wi-Fi 6E mesh systems offer a compelling alternative, significantly improving throughput, coverage, and congestion handling compared to older wireless standards. By distributing multiple nodes throughout your home, a mesh network reduces dead zones and maintains stronger signals in rooms distant from the main router. Whilst wireless will almost always introduce slightly higher latency and more variability than wired Ethernet, careful node placement and the use of the 5 GHz or 6 GHz bands can deliver performance that is more than adequate for most online games. When deciding between Ethernet and Wi-Fi, weigh the practicalities of cabling against your tolerance for occasional fluctuations in wireless performance.
Quality of service (QoS) router settings for latency reduction
Even with a robust physical connection, your gaming traffic competes with streaming services, cloud backups, and other devices on your network. Quality of Service (QoS) features built into many modern routers allow you to prioritise specific types of traffic, devices, or applications so that latency-sensitive packets receive preferential treatment. By assigning your gaming PC or console a higher priority, you can help ensure that downloads on another device do not cause sudden spikes in ping at critical moments. Some gaming-focused routers even include built-in profiles for popular titles, simplifying configuration for less technical users.
Configuring QoS typically involves logging into your router’s web interface, identifying your gaming device by MAC or IP address, and assigning it to a high-priority category. You can also set bandwidth limits for non-essential devices or services to prevent them from saturating your connection. Whilst QoS cannot compensate for issues outside your home—such as congestion at your ISP or game server problems—it often mitigates the everyday contention that arises in busy households. Think of it as assigning an express lane for your game packets, ensuring they are not stuck in the same queue as large file downloads or 4K video streams.
VPN services for DDoS protection: NordVPN and ExpressVPN
For most casual players, a VPN is optional; however, for streamers, competitive players, or anyone who has experienced targeted harassment, it can provide a valuable additional layer of security. By routing your traffic through a VPN provider such as NordVPN or ExpressVPN, your real IP address is obscured, making it harder for malicious actors to launch Distributed Denial of Service (DDoS) attacks directly against your home network. Some gaming VPN configurations can also help bypass inefficient routing paths, occasionally reducing latency to certain game servers, though this benefit is highly dependent on geography and provider infrastructure.
When integrating a VPN into your home gaming setup, there are trade-offs to consider. Encrypting and routing traffic through remote servers can introduce extra latency, which is undesirable for fast-paced online games. To minimise impact, choose VPN servers geographically close to the game servers you use most and test different endpoints to identify which delivers the best compromise between security and ping. Many players reserve VPN usage for specific scenarios—such as tournaments, streaming sessions, or when playing on public networks—rather than leaving it permanently enabled. As with other security tools, a VPN should complement, not replace, good digital hygiene, such as strong passwords and two-factor authentication.
Port forwarding and UPnP configuration for multiplayer stability
Network Address Translation (NAT) is a crucial part of modern home networking, but it can interfere with peer-to-peer connections used by many multiplayer games and voice chat services. Strict or moderate NAT types often manifest as difficulty joining lobbies, hosting matches, or hearing certain players in voice channels. Port forwarding and Universal Plug and Play (UPnP) offer two primary methods for resolving these issues, helping to establish more direct communication paths between your device and remote peers. UPnP allows devices and applications to request necessary ports automatically, whilst manual port forwarding involves explicitly opening specific ports for your gaming PC or console.
To improve multiplayer stability, you can start by enabling UPnP in your router settings if it is not already active; many modern games are designed to leverage this feature and will configure ports as needed. If problems persist, consult the support documentation for your specific title or platform, which often lists recommended ports for manual forwarding. Whilst opening ports can improve connectivity, it also exposes additional entry points to the internet, so it is important to forward only what is necessary and keep your router firmware updated. In most home environments, a balanced approach—using UPnP for convenience, supplemented by targeted port forwarding where required—strikes the best compromise between ease of use and security.
Ergonomic gaming furniture and posture-correcting setups
Extended gaming sessions can take a significant toll on your body if your environment does not support healthy posture and movement. Neck strain, lower back pain, and wrist discomfort are often the result of poorly designed or incorrectly adjusted furniture, rather than an inevitable side effect of gaming itself. Investing in ergonomic seating, desks, and monitor mounting systems transforms your gaming area into a space that not only enhances performance but also safeguards long-term well-being. Think of ergonomics as optimising your “human hardware”—just as you fine-tune your PC for maximum efficiency, you can configure your physical setup to keep you comfortable and focused.
Herman miller X logitech embody chair vs SecretLab titan evo
Two of the most discussed options in the premium gaming chair market are the Herman Miller X Logitech Embody and the SecretLab Titan Evo, each representing a distinct approach to ergonomic support. The Embody originates from the world of high-end office seating, with a design that emphasises dynamic support and micro-adjustments that encourage subtle movement throughout the day. Its pixelated backrest and flexible spine aim to distribute weight evenly, reducing pressure points during marathon sessions, whether you are raiding, streaming, or working from home. Many users describe it as an investment piece—expensive upfront but built to last for many years.
The SecretLab Titan Evo, on the other hand, blends gaming aesthetics with thoughtful ergonomic features, including a built-in, adjustable lumbar support system and a wide, flat seat base that accommodates various sitting positions. It offers extensive recline options and a memory foam head pillow, catering to those who enjoy a more traditional “racing-style” gaming chair with modern ergonomic refinements. When deciding between these two, consider your priorities: the Embody leans heavily into evidence-based ergonomic design with a subtler look, whilst the Titan Evo provides a more overtly gamer-focused appearance with robust comfort features at a lower price point. In either case, pairing your chair with correct desk height and monitor positioning is essential to realise the full ergonomic benefits.
Standing desk converters and height-adjustable workstations
Sitting for prolonged periods has been linked to various health concerns, and many gamers now seek ways to incorporate more movement into their home setups. Height-adjustable desks and standing desk converters offer a flexible solution, allowing you to alternate between sitting and standing without disrupting your workflow or gameplay. Electric sit-stand desks, in particular, make position changes effortless—at the touch of a button, you can raise the entire workstation to a standing height, then lower it again when you wish to sit. Over time, these micro-adjustments can reduce stiffness and help maintain energy levels during longer sessions.
If replacing your current desk is not practical, a standing desk converter that sits on top of your existing surface can provide similar benefits. These platforms lift your monitor, keyboard, and mouse to a standing-friendly height while leaving the underlying desk intact. Regardless of which option you choose, the key is to configure the setup so that your elbows rest at roughly 90 degrees when typing, and your screen sits at or slightly below eye level. Alternating between positions periodically—rather than standing constantly—tends to be more sustainable, and pairing your desk with an anti-fatigue mat can further enhance comfort when standing.
Monitor arm mounting systems for optimal viewing angles
Monitor arms play a pivotal role in fine-tuning the ergonomics of your home gaming setup by granting precise control over screen height, distance, and angle. Instead of being constrained by the fixed stand that shipped with your display, a VESA-compatible arm allows you to position the monitor so that your neck remains neutral and your eyes align with the top third of the screen. This reduces the tendency to hunch or crane forward, which can contribute to neck and upper back discomfort during long play sessions. Dual or triple monitor arms are especially beneficial for simulators, content creators, or streamers who rely on multiple displays.
When selecting a monitor arm, pay attention to weight ratings and maximum screen size to ensure compatibility with your current and future displays. Gas spring arms provide smooth, effortless adjustment, letting you reposition your monitor with one hand as you shift between gaming, work, and media consumption. Cable management channels built into many arms help maintain a tidy aesthetic, keeping power and display cables neatly routed out of sight. Combined with an ergonomic chair and correctly set desk height, a well-adjusted monitor arm can dramatically improve comfort and focus, enabling you to enjoy your games without constantly shifting to relieve strain.
Software optimisation and game launcher management
Hardware upgrades and physical ergonomics can only carry your gaming experience so far if your software environment is poorly configured. Background processes, inefficient game launcher settings, and suboptimal operating system configurations can all sap performance and introduce stutters or delays. By streamlining your software stack and taking advantage of built-in gaming features, you can ensure that more of your system’s resources are dedicated to rendering frames and processing inputs, rather than running unnecessary tasks. Effective software optimisation also keeps your library organised, making it easier to discover and launch games without sifting through multiple overlapping platforms.
Windows 11 game mode and hardware-accelerated GPU scheduling
Windows 11 includes several features designed to enhance gaming performance, chief among them Game Mode and hardware-accelerated GPU scheduling. Game Mode signals the operating system to prioritise resources for the active game, reducing background activity and minimising the likelihood of intrusive updates or scans that could cause frame drops. Enabling this feature is as simple as navigating to the Gaming section in Windows Settings and toggling Game Mode on, yet many users overlook it after upgrading their OS. For titles that are sensitive to CPU spikes, this small change can smooth out frame pacing and reduce micro-stutter.
Hardware-accelerated GPU scheduling, available on compatible graphics cards and drivers, shifts some scheduling responsibilities from the CPU to the GPU, potentially lowering latency and improving responsiveness in certain scenarios. You can enable it within the Graphics settings section of Windows, though its impact varies depending on hardware and game engine. As with any system-level tweak, it is wise to test your most-played titles before and after enabling the feature, watching for changes in frame time consistency and overall stability. Combined with up-to-date drivers and selective disabling of unnecessary startup programs, these built-in tools help keep your system focused on delivering a smooth, uninterrupted gaming experience.
Steam library consolidation and GOG galaxy 2.0 integration
With the proliferation of digital storefronts—Steam, Epic Games Store, Origin, Ubisoft Connect, Xbox, and more—many gamers now juggle fragmented libraries spread across multiple launchers. This fragmentation can make it harder to track which games you own, where they are installed, and which launcher needs to be open to play them. Tools like GOG Galaxy 2.0 address this challenge by aggregating your libraries into a single, unified interface, pulling in metadata and playtime statistics from various platforms. Within one dashboard, you can browse and launch titles regardless of where you originally purchased them, simplifying discovery and reducing launcher clutter.
Even within Steam itself, a bit of organisational effort pays off. You can create custom categories, apply filters based on tags or genres, and hide games you no longer play to keep your visible list focused on current favourites. Regularly pruning your installed titles—moving rarely played games to secondary drives or uninstalling them entirely—helps free up SSD space and keeps patching overhead manageable. By centralising your game library and curating what remains installed, you streamline not only your launch process but also background tasks such as automatic updates and cloud synchronisation, all of which contribute to a smoother home gaming experience.
Discord overlay optimisation and communication quality settings
Voice communication has become integral to modern multiplayer gaming, and Discord remains the platform of choice for many communities. However, its rich feature set can also consume system resources or visually clutter your HUD if not configured thoughtfully. The in-game overlay, for example, is useful for seeing who is speaking or accessing quick controls, but excessive elements on screen can distract from critical visual information. Within Discord’s settings, you can tailor the overlay to display only essential data—or disable it entirely for specific games—to strike a balance between awareness and focus.
Audio configuration is equally important for clear, low-latency communication. Enabling features such as noise suppression, echo cancellation, and automatic gain control can improve intelligibility, particularly if you game in a noisy environment or use an open-back headset. At the same time, over-aggressive processing may cut off quiet speech or introduce artefacts, so it is worth experimenting with different settings and testing them with friends. Selecting the appropriate server region for your voice channels and using the “High Priority” packet setting can also help reduce latency and packet loss during intense matches. By fine-tuning Discord’s overlay and audio options, you ensure that communication enhances, rather than detracts from, your overall gaming experience at home.